Happily Ever After
Almost 11 years ago, I received a phone call from Melanie stating that she was engaged (maybe the love story will make a blog) & asked that I share her future day with her! Of course! I wouldn't pass that up for the world. Her one request as me being a bridesmaid; wear a black dress! Probably the best thing any bridesmaid has ever heard. No "special" dress; something I won't wear again, or have to shorten to make it wearable again.
Back about 3 years from her 10 year anniversary, we had talked about "doing it again." There were people that didn't get to be a part of the nuptials or that weren't friends at that time and why not put the dress on again & have a photoshoot or share a fun dinner?!?
About a year ago, Melanie went to pull her gown out of the box and discovered that after having it dry cleaned & stored, the dress was stained. I haven't been a bride, but I can only imagine the heartbreak that comes with finding your wedding dress in that condition.
By July, we had discussed options; try to re-clean which could cost you a lot of money and there would be no promise that it would come out, dye the dress but you never know exactly how the color will take, or maybe paint the dress but what do you paint on your wedding dress?
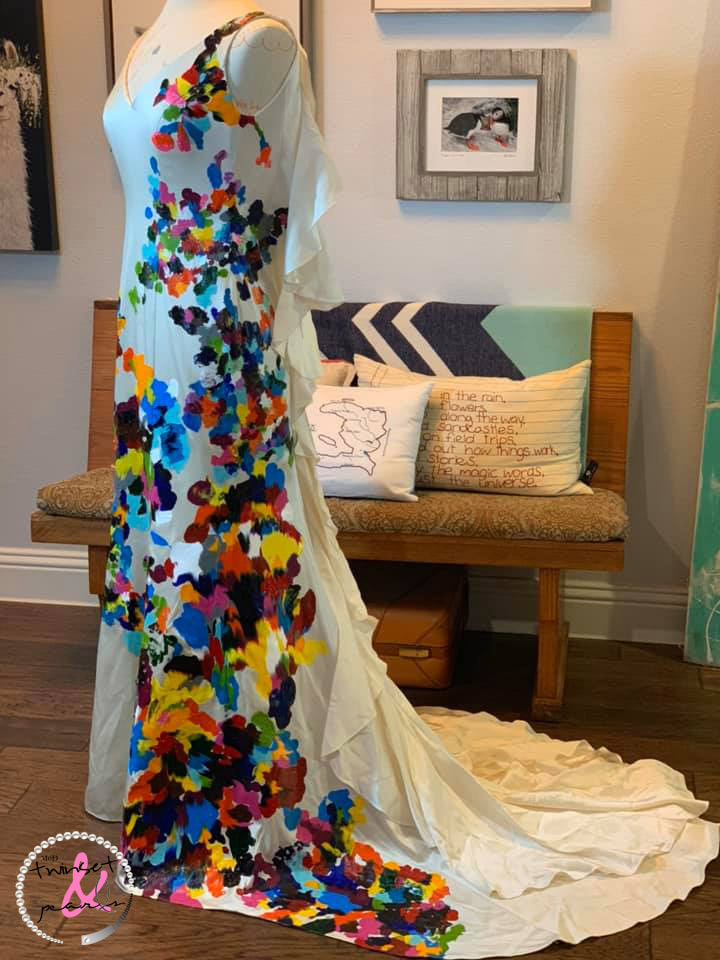
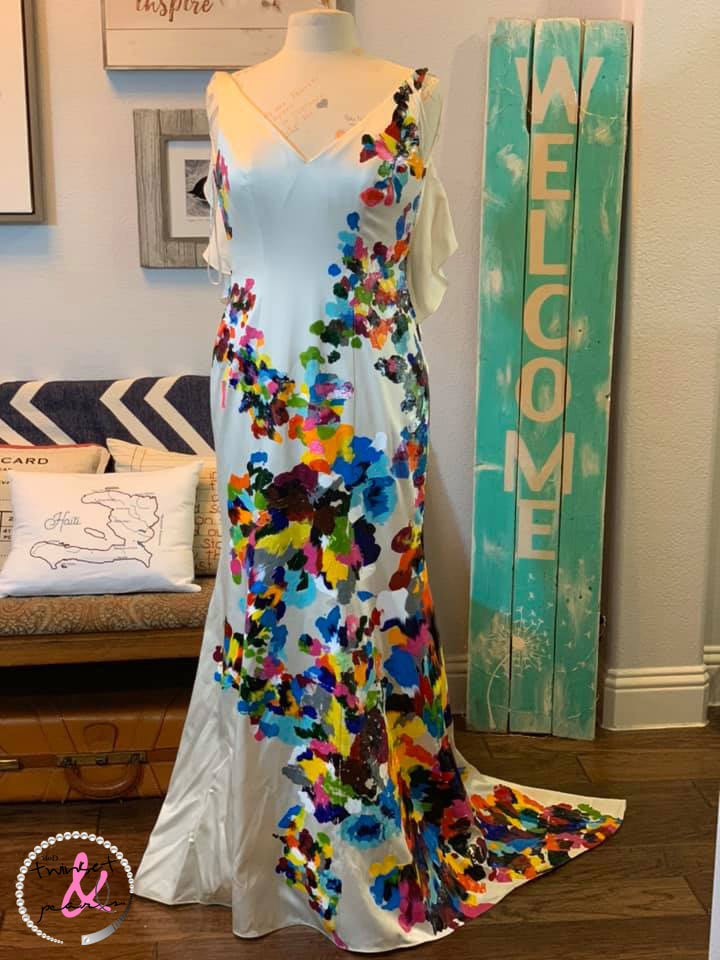
Melanie isn't a floral print person which cuts down on a lot of the quick options when painting, so maybe a print that resembles the location where they got married. But would everyone understand it and would the print fully cover the dress' now imperfections in the stain? While I was scrolling through Instagram, there was an image by a Dallas designer, Nardos, of a blue jacket dress with an abstract floral-like print around to bottom. I sent the image to Melanie and asked if something like this would be something she would like to cover the stains on her dress.
When she approved, it was figuring out how to make it happen & the process to get the dress printed. Melanie and I think very differently. I am one that figures out how to go from point A to point B with cliff notes & quick guideline while figuring it out as I go and creating my own process. Melanie is very by the books, and I love her for it, and likes to be able to see the how (like how to lay it out) before starting the process. This has never been something that we haven't known about each other, but when it comes to something like this, I want to make sure that I work how she is comfortable & help her see each step.
I remembered a process that I had used in school where you used transfer paper to be able to see image on the canvas where print was going to land. So what if you take wax paper in pieces and you can put a piece of paper under it that would allow the guidance needed on where color could be placed. Once the paint was on the wax paper, you flip and press the pain onto the dress/fabric. Sounds easy enough, right? But remember, we still had to cover the stain correctly.
Melanie and I worked on the first test piece after I found some random fabric at Joann's that match her dress. Because it wasn't something that Melanie had done before, I wanted to make sure that she was comfortable with how it would work and that she got a good feel on how it would possibly work.
Back about 3 years from her 10 year anniversary, we had talked about "doing it again." There were people that didn't get to be a part of the nuptials or that weren't friends at that time and why not put the dress on again & have a photoshoot or share a fun dinner?!?
About a year ago, Melanie went to pull her gown out of the box and discovered that after having it dry cleaned & stored, the dress was stained. I haven't been a bride, but I can only imagine the heartbreak that comes with finding your wedding dress in that condition.
By July, we had discussed options; try to re-clean which could cost you a lot of money and there would be no promise that it would come out, dye the dress but you never know exactly how the color will take, or maybe paint the dress but what do you paint on your wedding dress?
Melanie isn't a floral print person which cuts down on a lot of the quick options when painting, so maybe a print that resembles the location where they got married. But would everyone understand it and would the print fully cover the dress' now imperfections in the stain? While I was scrolling through Instagram, there was an image by a Dallas designer, Nardos, of a blue jacket dress with an abstract floral-like print around to bottom. I sent the image to Melanie and asked if something like this would be something she would like to cover the stains on her dress.
When she approved, it was figuring out how to make it happen & the process to get the dress printed. Melanie and I think very differently. I am one that figures out how to go from point A to point B with cliff notes & quick guideline while figuring it out as I go and creating my own process. Melanie is very by the books, and I love her for it, and likes to be able to see the how (like how to lay it out) before starting the process. This has never been something that we haven't known about each other, but when it comes to something like this, I want to make sure that I work how she is comfortable & help her see each step.
I remembered a process that I had used in school where you used transfer paper to be able to see image on the canvas where print was going to land. So what if you take wax paper in pieces and you can put a piece of paper under it that would allow the guidance needed on where color could be placed. Once the paint was on the wax paper, you flip and press the pain onto the dress/fabric. Sounds easy enough, right? But remember, we still had to cover the stain correctly.
Melanie and I worked on the first test piece after I found some random fabric at Joann's that match her dress. Because it wasn't something that Melanie had done before, I wanted to make sure that she was comfortable with how it would work and that she got a good feel on how it would possibly work.
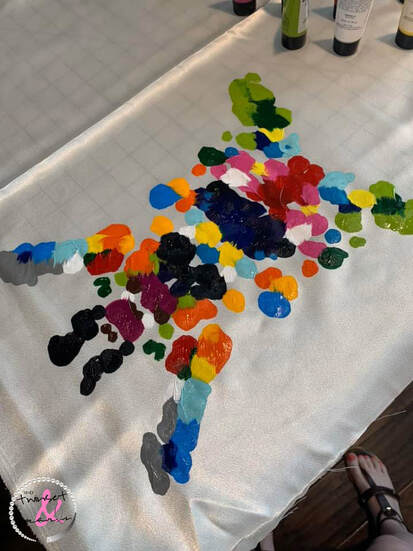
Remember the ink blot images from psychology, we started with that idea where we folded the image in half and the pressed on the fabric. It was decided that no folding in an attempt to not have it so symmetrical.
As we started to paint on the second transfer piece, Melanie liked the way it was looking, so I asked if she was ready to go for it and just start to make it happen on the dress. She gave me the ok and we made sure that the dress was ready & prepped to take the paint.
As we placed the paint on the dress, we pressed it in, I then asked if she was ready to pull it off & see what we just created. Hopeful, but not really sure how she would feel about it until it was all done, but anxious to see the first print added to the dress, we each took a side and pulled! Waiting for a response and seeing how excited she was, I told her that I still couldn't believe that she was letting me do this to her dress. She might have been surprised that I was surprised, but seriously, we were painting her dress! As we started to make our way down the dress, each of us got more comfortable and we started to pull the transfer off in different ways to add texture and movement within the paint.
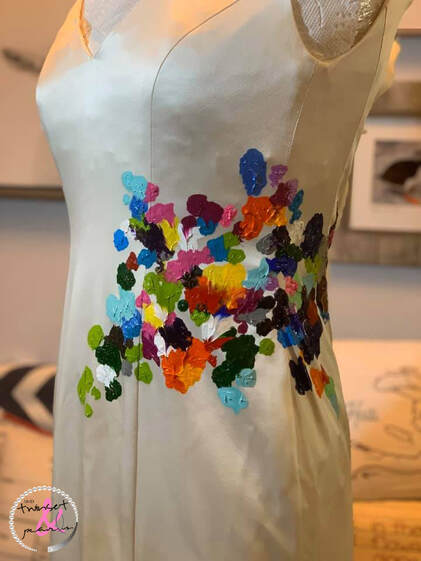
We called it just before completely covering the stains, as there were spots we needed to have dry prior to moving the dress and painting the remaining spots. While the dress was on the form, we tried to place in the most flattering spots with full intention. This made it easier as the work continued off of the form so that there were few questioning spots to press on paint.
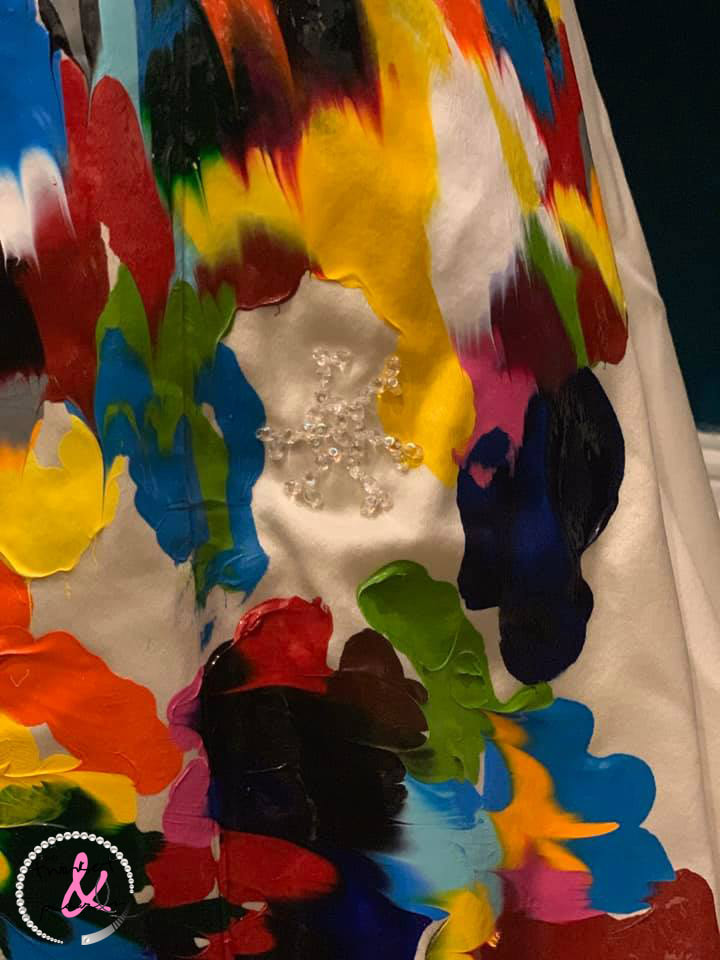
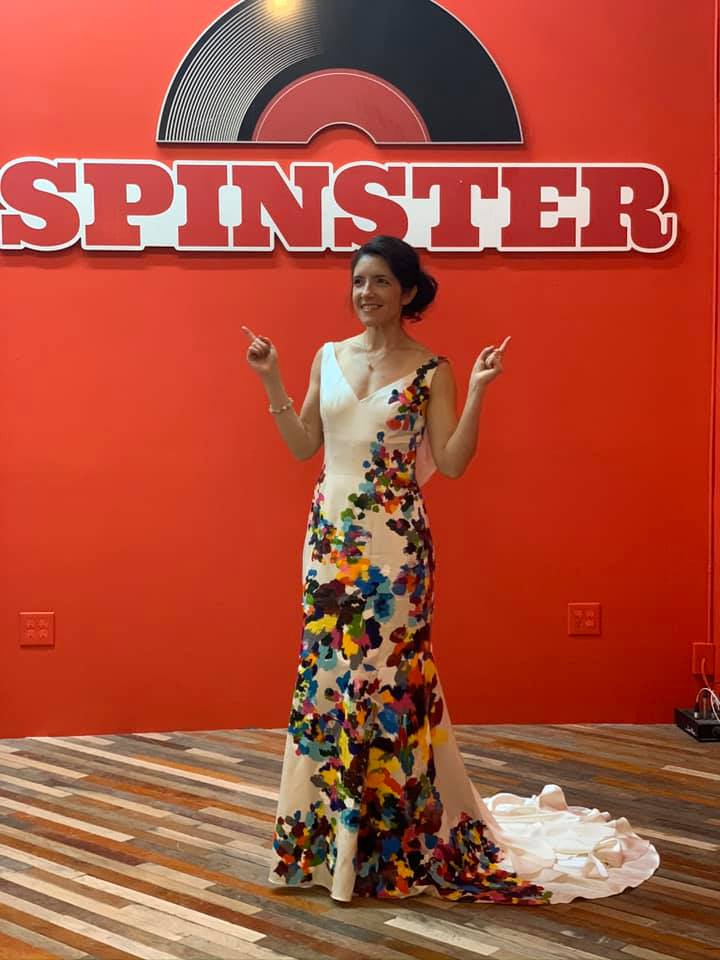
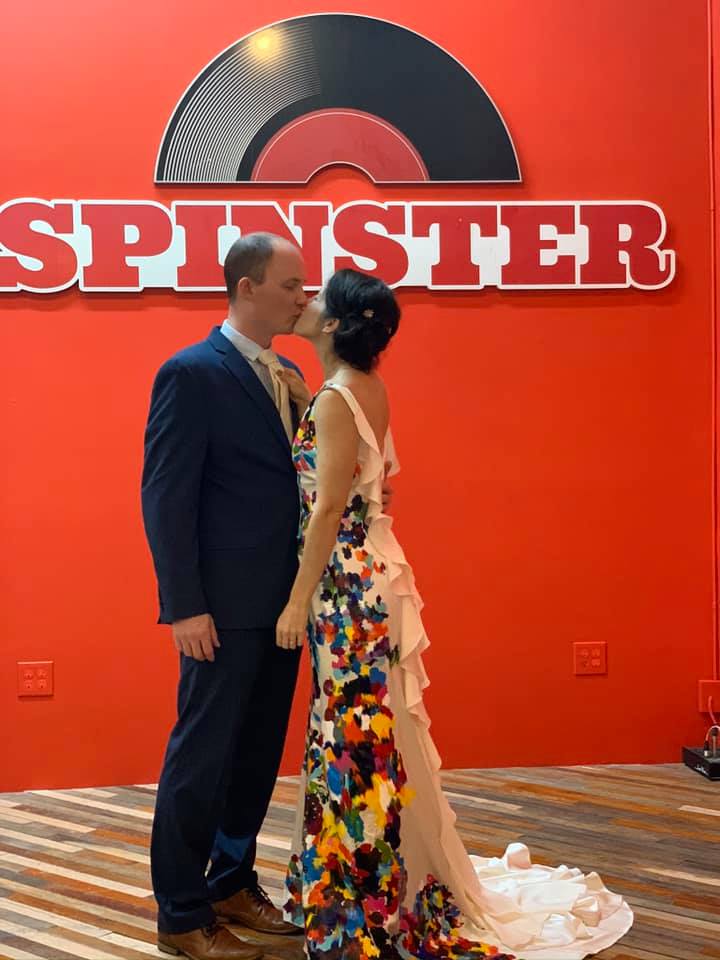
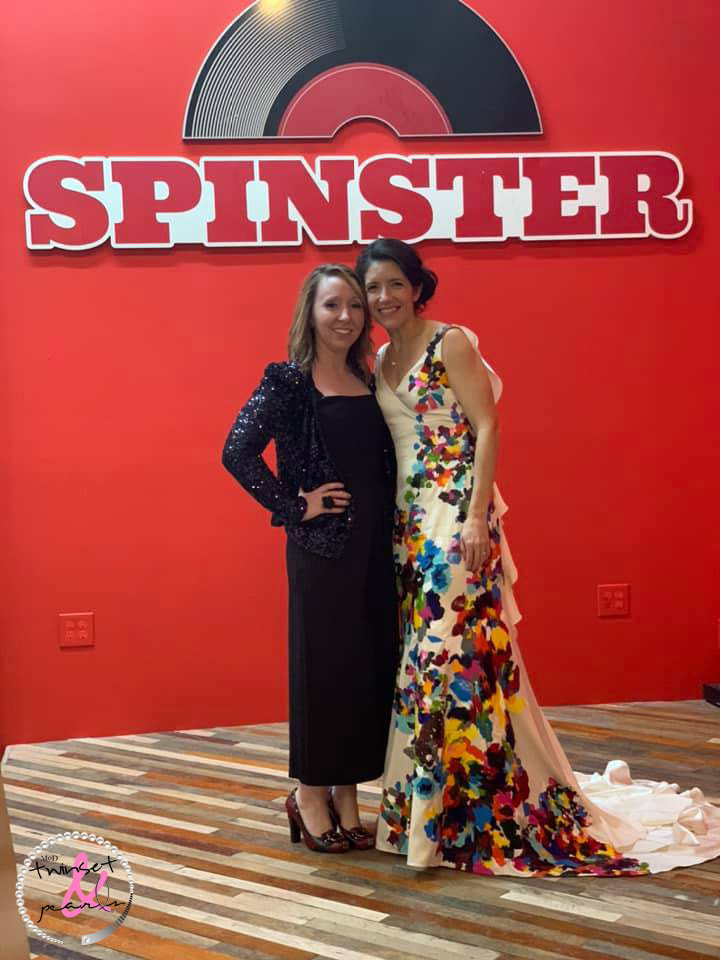
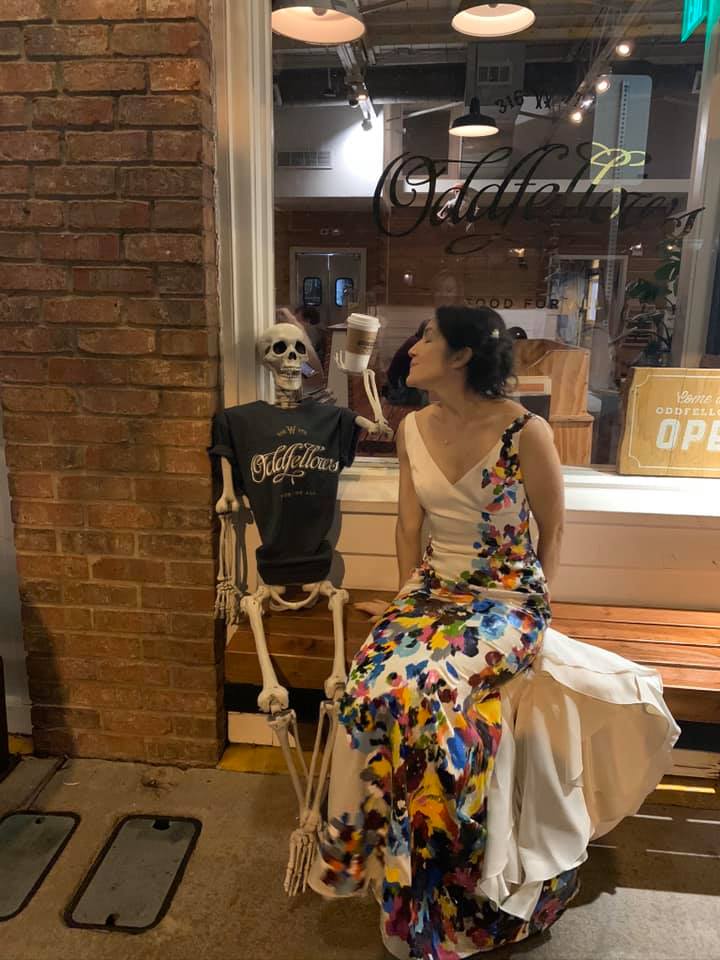
After completing the paint process, I added beading throughout the dress & a special beaded snowflake on the dress. The party was the only thing left to plan. The first time seeing the dress, fully done was 5 minutes before walking out the door to go to dinner with family & friends. I have to say, I was pretty happy with it and we had lots of people saying how pretty it was. Now we have to figure out how to frame it & hang it on a wall.
After completing the paint process, I added beading throughout the dress & a special beaded snowflake on the dress. The party was the only thing left to plan. The first time seeing the dress, fully done was 5 minutes before walking out the door to go to dinner with family & friends. I have to say, I was pretty happy with it and we had lots of people saying how pretty it was. Now we have to figure out how to frame it & hang it on a wall.